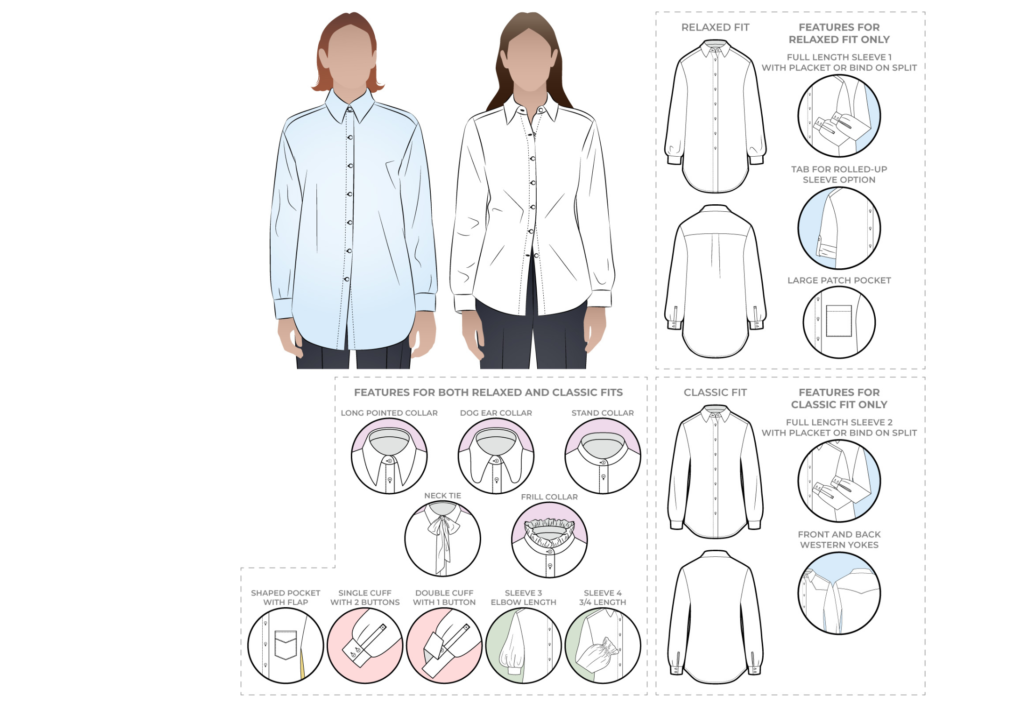
CONSTRUCTION:
RELAXED FIT SHIRT WITH DOUBLE YOKE:
Click here to see a Youtube video on how to sew a double yoke using the ‘burrito method’.
Click here to see the illustrated double shirt yoke tutorial on stylearc.com
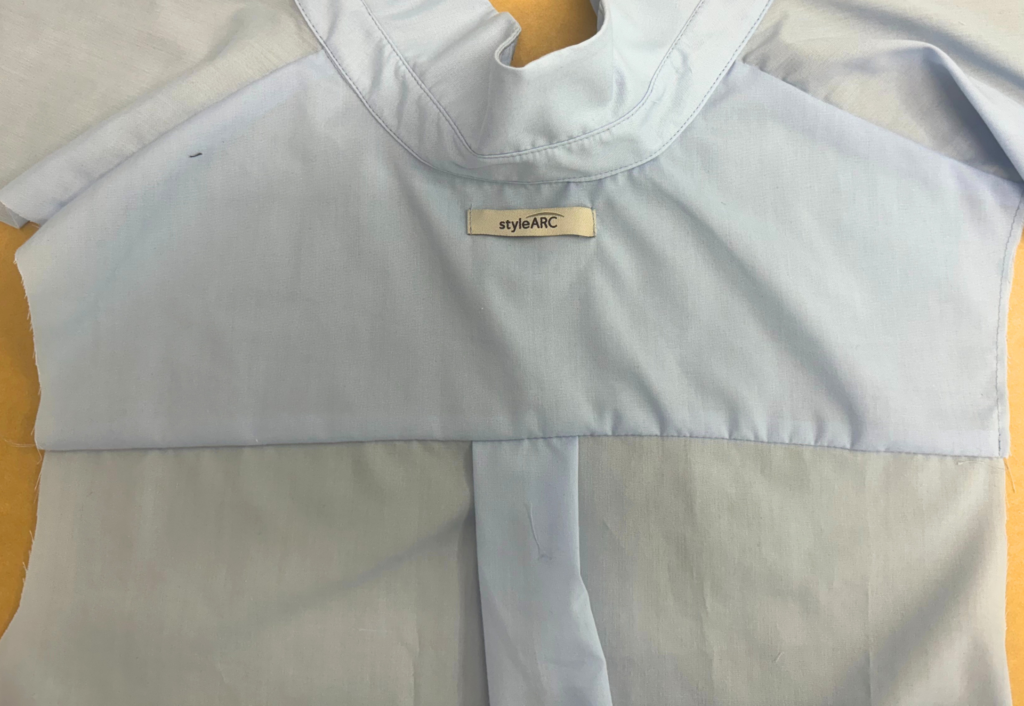
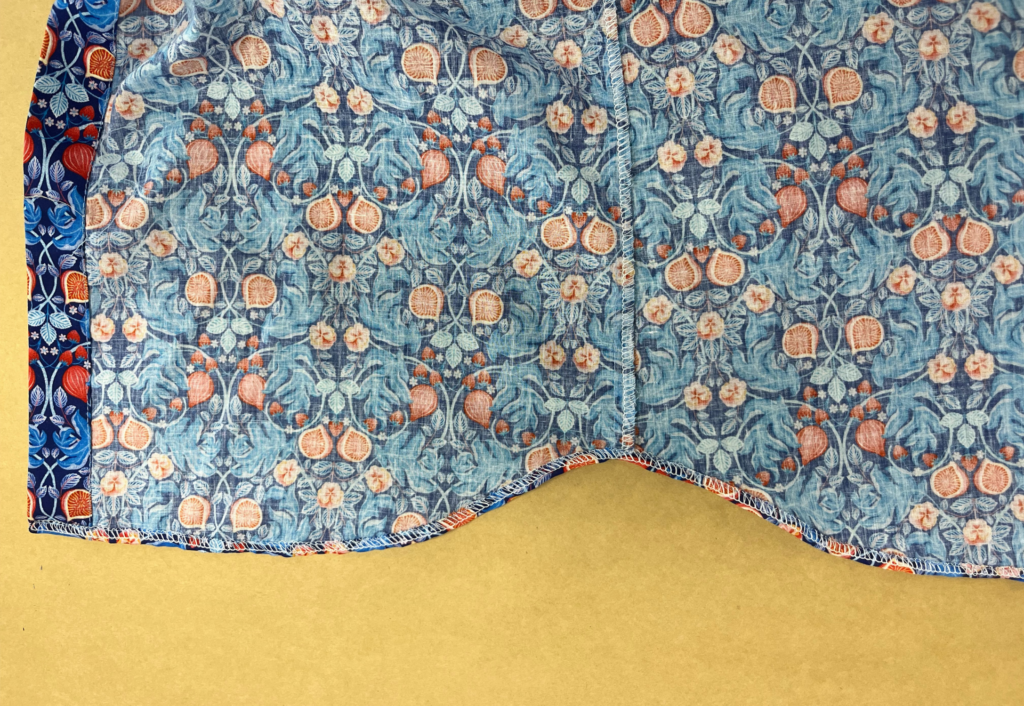
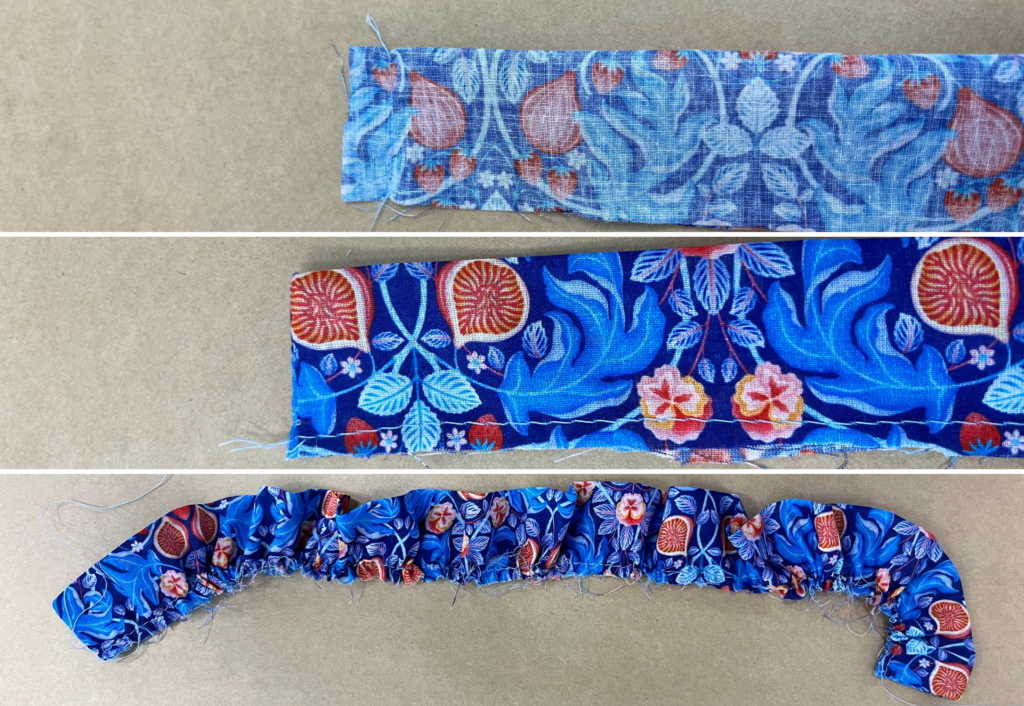
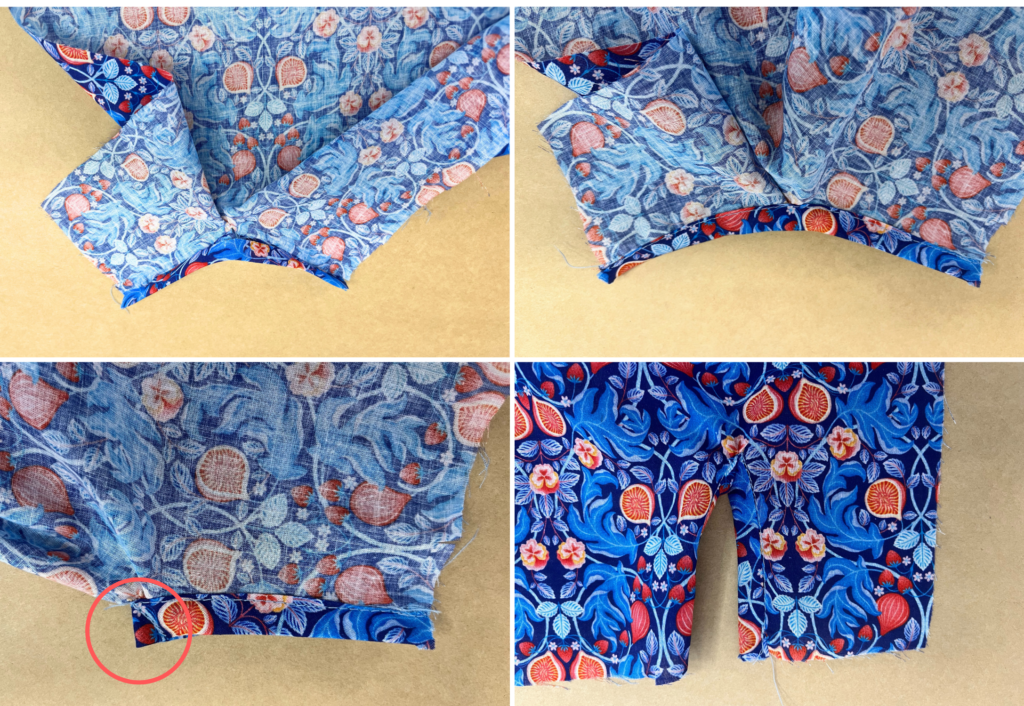
With wrong sides facing fold the centre Back (1) body in half and stitch down the back box pleat as marked on the pattern, open the box pleat and press flat. Baste stitch across the top of the box pleat to hold in place.
Sandwich the top of the back bodice between the base of the right sides of the two Back Yokes (3), stitch together. Once sewn turn up both yokes and press the back yoke seam upwards.
Roll the whole back body up with the right side on the inside then pin to keep it out of the way. With right sides facing pin the top yokes to the front body seam and sew, roll with the wrong side on the inside and pin the
fronts to keep out of the way.
Cover the rolled pieces with the under yoke, then sew the front yoke seams together. Pull through and turn out to the right side, stay stitch the neck to hold in place and prevent stretching.
Double fold the front turn back to the inside following the markings on the pattern and pin in place. Topstitch down the front along the inner folded edge to hold the turn back in place.
Neaten the hems up to the side notches with an overlocker/serger. Turn the hem to the inside once and topstitch taking care not to “rope” (twist) the hem.
With right sides facing sew the front and back side seams together, stitch from the side notch up to the underarm. Neaten the seam with an overlocker/serger and press towards the back.
CLASSIC FIT SHIRT WITH OPTIONAL WESTERN YOKE:
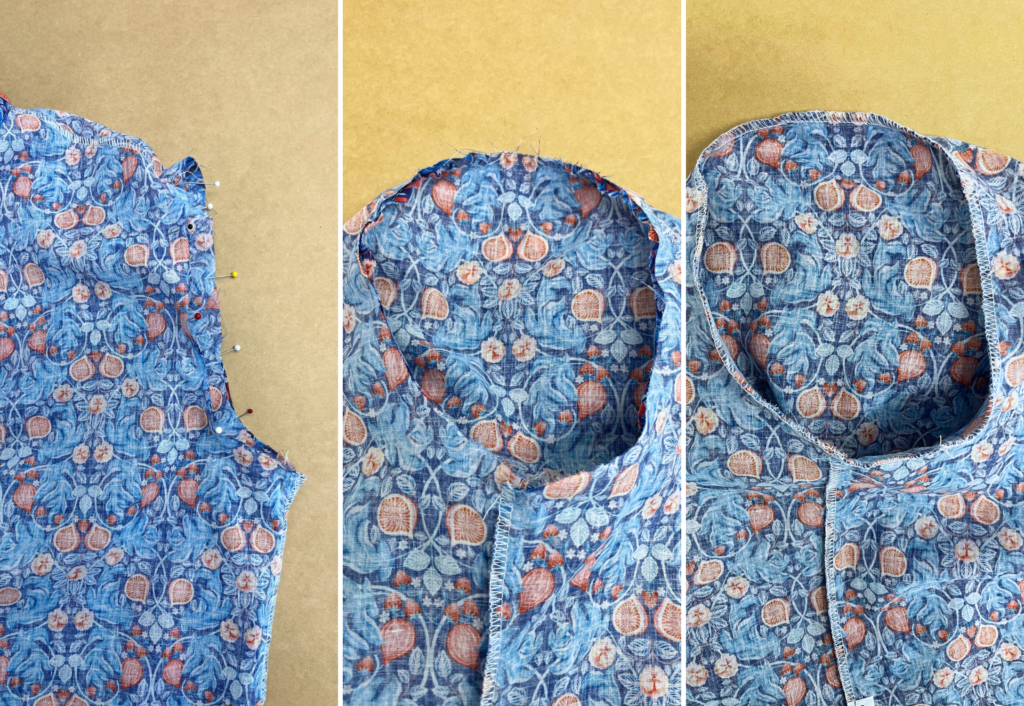
With right sides facing sew the front and back shoulder seams together. Neaten with an overlocker/serger and press towards the back. Sew a topstitch on top of the seam on the side of the back, this can be twin needle or an edge stitch.
If using the western style yokes: Prepare the yokes by pressing the seam allowance of the angled seams of the yokes to the inside. Please note these yokes are sewn on top of the body (wrong side of yoke facing the right side
With right sides facing sew the front and back shoulder seams of the yokes of the body) together and press open. Pin the wrong sides of the yokes to the right side of the front and back bodies lining up the neck and shoulders.
Stay stitch around the neck, shoulders and armholes to hold to yokes in place on top of the body. Edge stitch or twin needle topstitch the angled edges of the yokes to the body.
Following the markings on the pattern, double fold the front turn back to the inside and pin in place. Sew a topstitch down the front along the inner folded edge to hold the turn back in place.
With right sides facing sew the front and back side seams together. Neaten the seam with an overlocker/serger and press towards the back.
Neaten the hem with an overlocker/serger, turn to the inside once and top stitch taking care not to “rope” (twist) the hem.
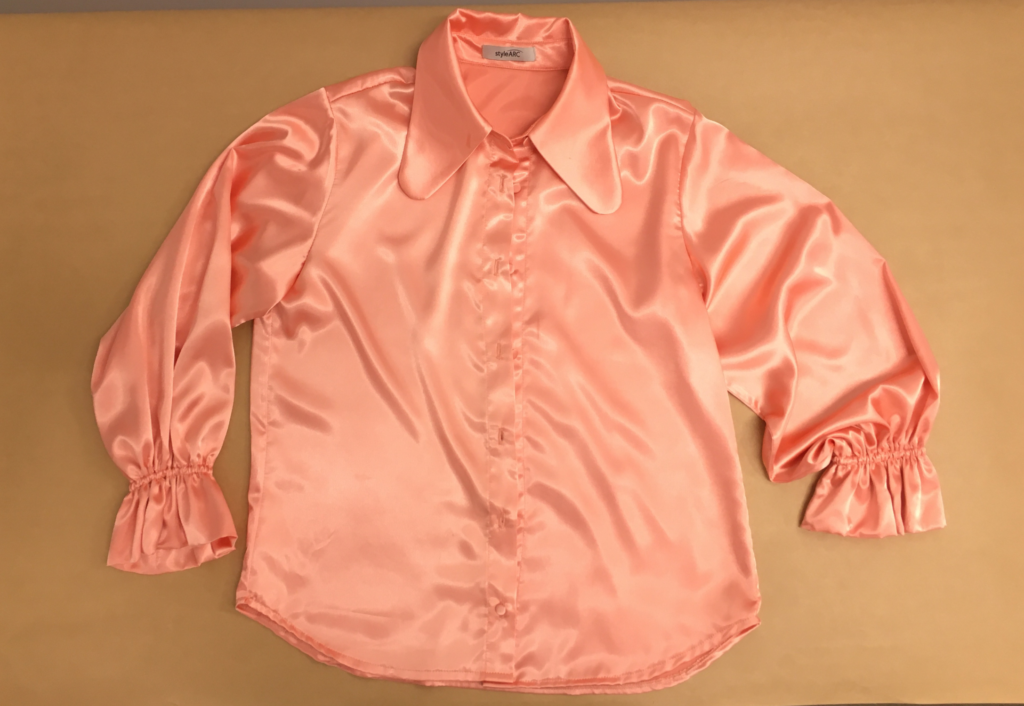
COLLARS WITH COLLAR STAND – The following instructions relate to the standard collar (7), pointed collar (8) and dog ear collar (9). All collars are suitable for both relaxed and classic fit bodies.
With right sides facing, sew the outer and short ends of the collars together using a 6mm (1/4”) seam allowance. Clip the corners (or clip into the curve of the seam if using the dog ear collar) and turn out to the right side and
press.
Press the seam allowance (6mm /1/4”) of the lower edge of the outer collar stand upward. Place the collar between the right sides of the collar stands and stitch together, sandwiching the collar between the two collar
stands.
Press and put aside.
STAND COLLAR – Use the collar stand (6) for this collar
Press the seam allowance (6mm/1/4”) of the lower edge of the outer collar stand upward. With right sides facing sew the top and rounded edges of the collar with a 6mm (1/4”) seam allowance leaving the neck edge open.
Turn the collar stand out to the right side, understitch close to the seam on the side of the undercollar stand, press, and set aside.
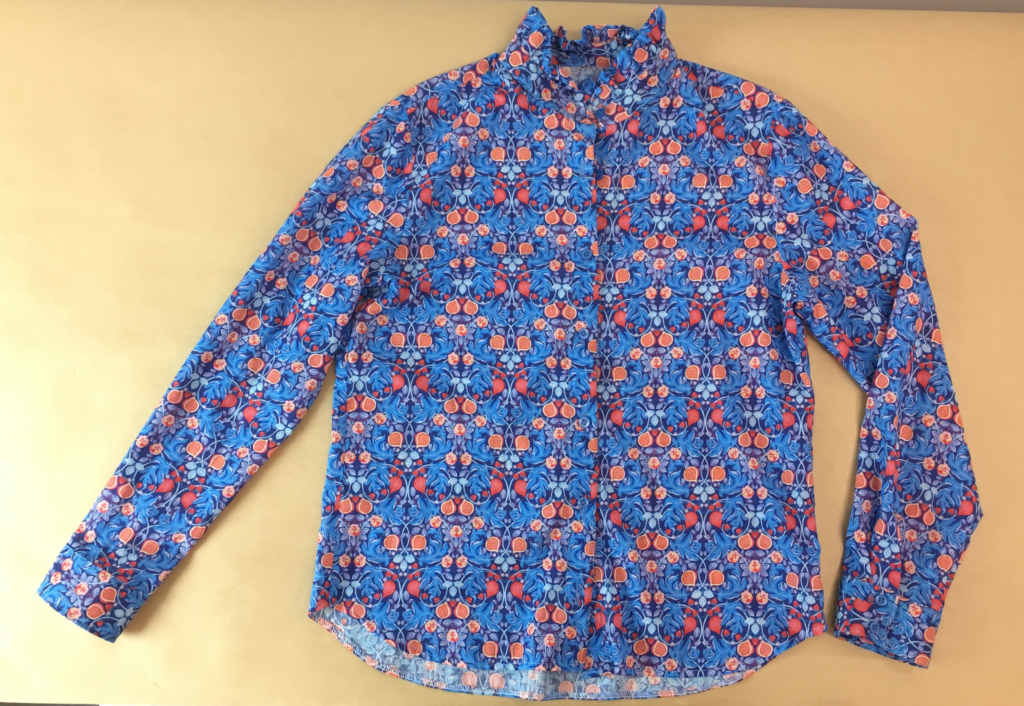
STAND COLLAR WITH FRILL – Use the collar stand (6) and neck frill (10) for this collar
Fold the neck frill in half lengthways with right sides facing. Sew across each short end, clip the corners and turn out to the right side and press. Sew a large gathering stitch along the cut edges of the frill and gather in to
match the length between the notches on the collar stand.
Press the seam allowance (6mm/1/4”) of the lower edge of the outer collar stand upward. Sandwich the gathered frill between the right sides of the collar stands between the notches and pin together. Once in place sew
both collars stands together with a 6mm (1/4”) seam allowance, leaving the neck edge open.
Turn the collar stand out to the right side, press and put aside.
ATTACHING COLLAR STAND TO THE NECK – The following instructions apply to both the relaxed and classic body styles
Sew the inside collar stand to the wrong side of the neckline with a 6mm (1/4”) seam allowance matching the notches. Stitch the pre-pressed edge of the outer collar stand to the neckline with an edge stitch on the side of the
collar stand, and continue the edge stitch completely around the collar stand.
NECKTIE – Use the necktie (11) for this option. The necktie is suitable for both the relaxed and classic styles
With right sides facing fold the neck tie in half lengthways and sew along the length and both short ends, leaving a small opening where marked on the pattern, use the opening to turn the tie out to the right side. Press and
sew up the opening with a hand stitch.
LARGE POCKET – This larger pocket can only be used on the relaxed fit body, use the large pocket (27) for this option
Neaten the top edge of the pocket top with an overlocker/serger. Fold the pocket top over with right sides facing and sew down each side of the turnover. Clip the corners and turn the pocket top out to the right side. Press the remaining seam allowances to the inside and press.
Sew a top stitch across the base of the pocket top turn back using the overlocking as a guide.
Pin the pocket to the front body where marked on the pattern. Once in place sew around the outer edges of the pocket with an edge stitch to secure to the body.
SHAPED POCKET & POCKET FLAP – This pocket option can be used on both the relaxed and classic style bodies. Use the shaped pocket (25) and pocket flap (26) for this option
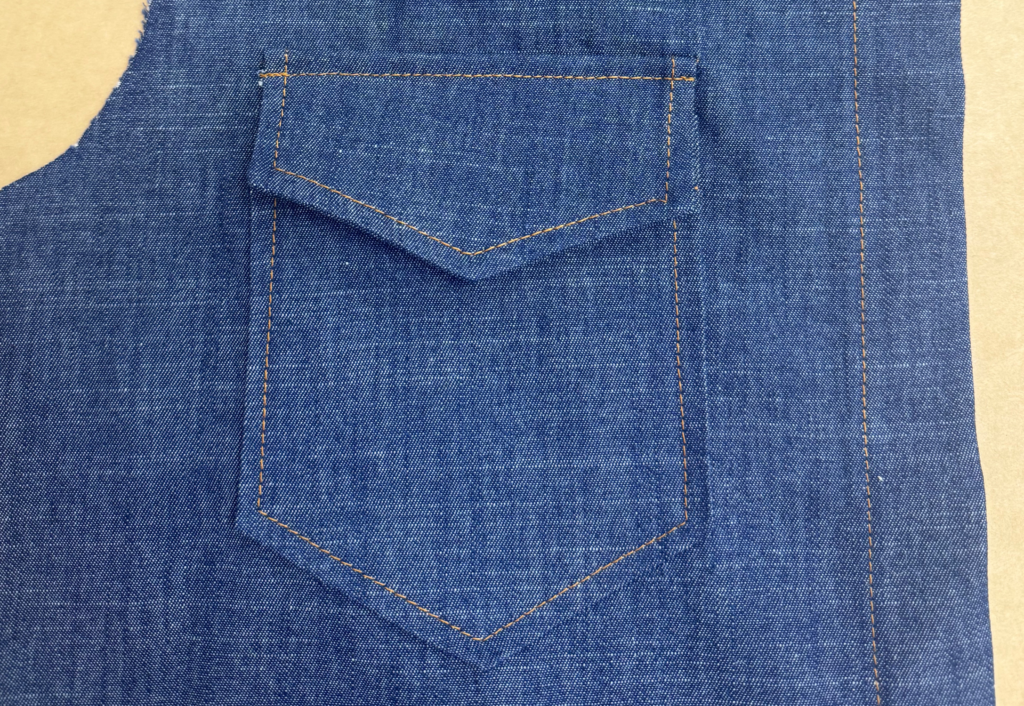
With right sides together sew around each short side and the pointed edges of the pocket flaps. Clip the corners and turn to the right side, press and topstitch with either twin needle or edgestitch.
Neaten the top edge of the pocket top with an overlocker/serger. Fold the pocket top over with right sides facing and sew down each side of the turnover. Clip the corners and turn the pocket top out to the right side.
Press the remaining seam allowances to the inside and press.
Sew a top stitch across the base of the pocket top turn back using the overlocking as a guide.
Pin the pocket to the front body where marked on the pattern. Once in place sew around the outer edges of the pocket with an edge stitch to secure to the body.
With the point of the pocket flap facing upwards, sew the pocket flaps to the body above the pocket following the marking on the pattern. The pocket flaps are to be in line with the pockets.
Press the pocket flap down to cover the pocket and sew topstitch (twin needle or edgestitch) across the top of the pocket flap.
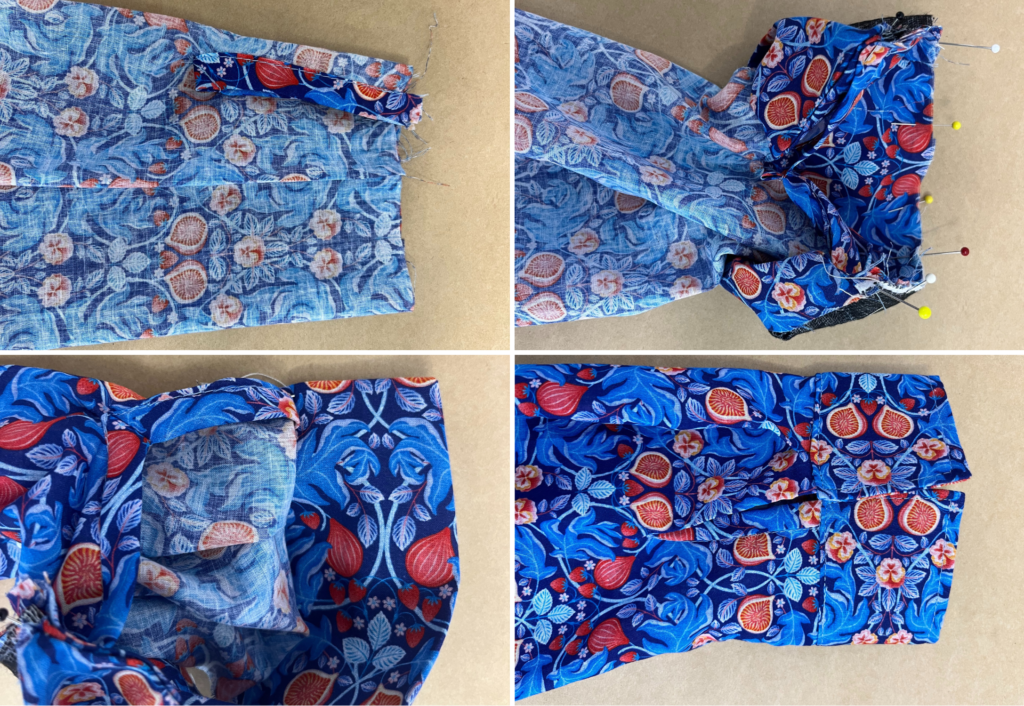
BASIC SLEEVE OPENING BIND – Suitable for relaxed fit sleeve 1 (14) and classic sleeve 2 (15). Use the optional sleeve bind (21) for this option
With right sides facing sew the raw edges of the binding to the split opening. Press the seam allowance of the other edge of the binding to the inside. Turn the binding over to the right side of the sleeve and with the
seam allowance pressed in, sew the binding to the sleeve split with an edge stitch.
Pinch the top of the binding in half and sew a diagonal dart through the binding at the top of the split. Turn the binding so that it is on the back side of the sleeve split and staystitch into place.
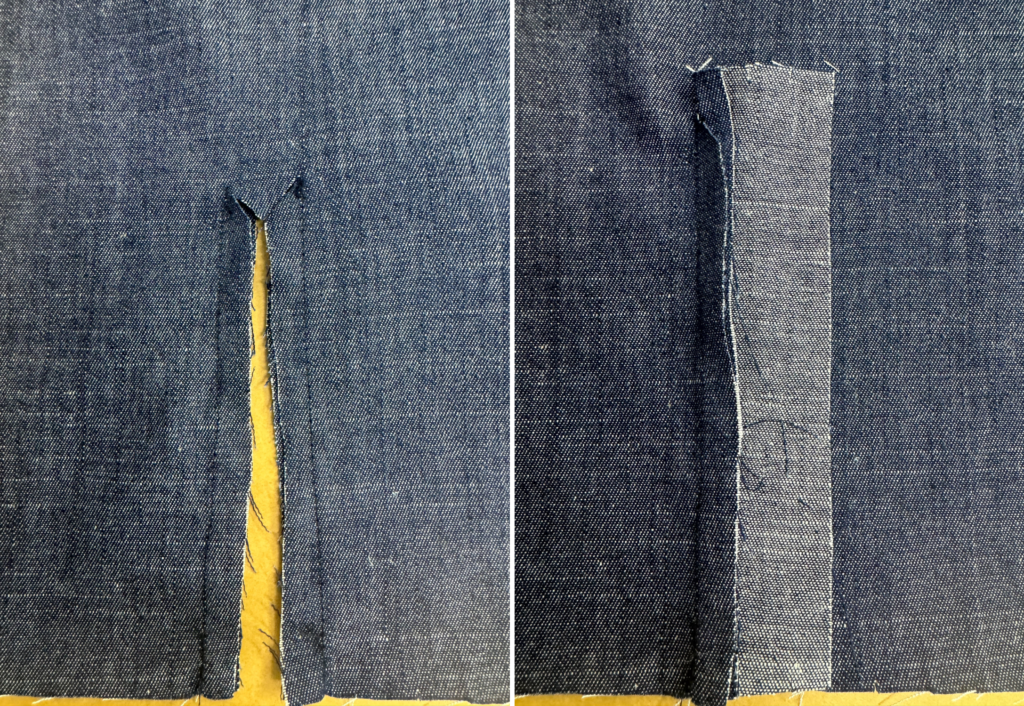
SLEEVE OPENING PLACKET – Suitable for relaxed fit sleeve 1 (14) and classic sleeve 2 (15). Use the under bind (22) and optional sleeve placket (23) for this option
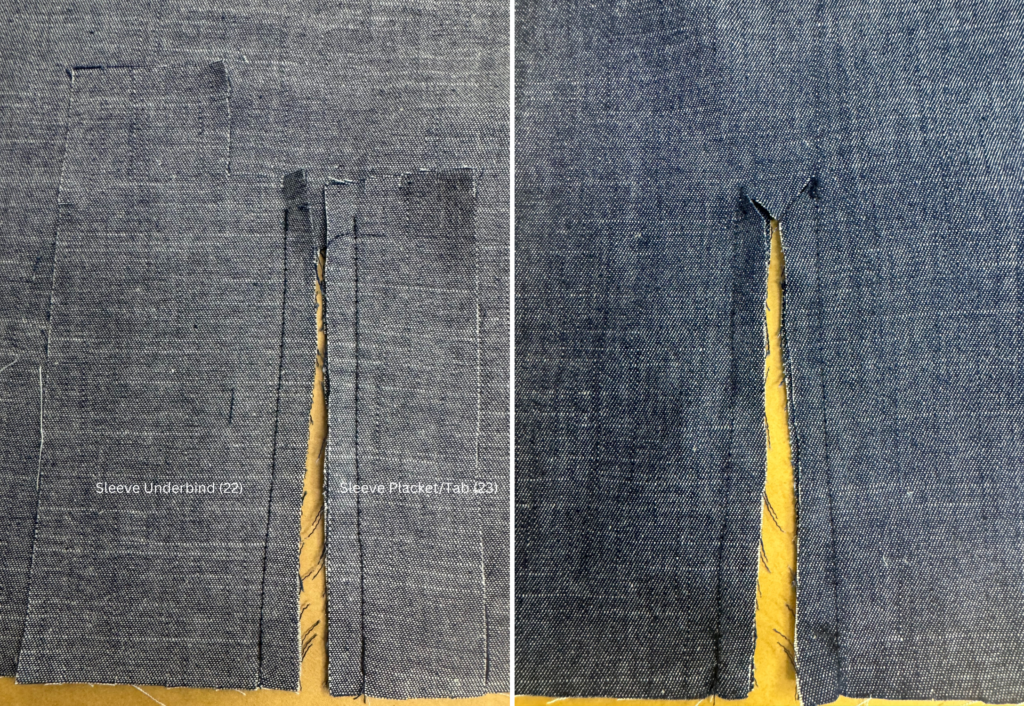
With right sides together pin the bind and the placket/tab to either side of the of the marked split on the sleeve. The bind is pinned closest to the under-sleeve seam. Once in place sew each side and across the top. Cut the split and clip a “V” into the top seams. This “V” is pressed upwards and will be covered by the tab when completed.
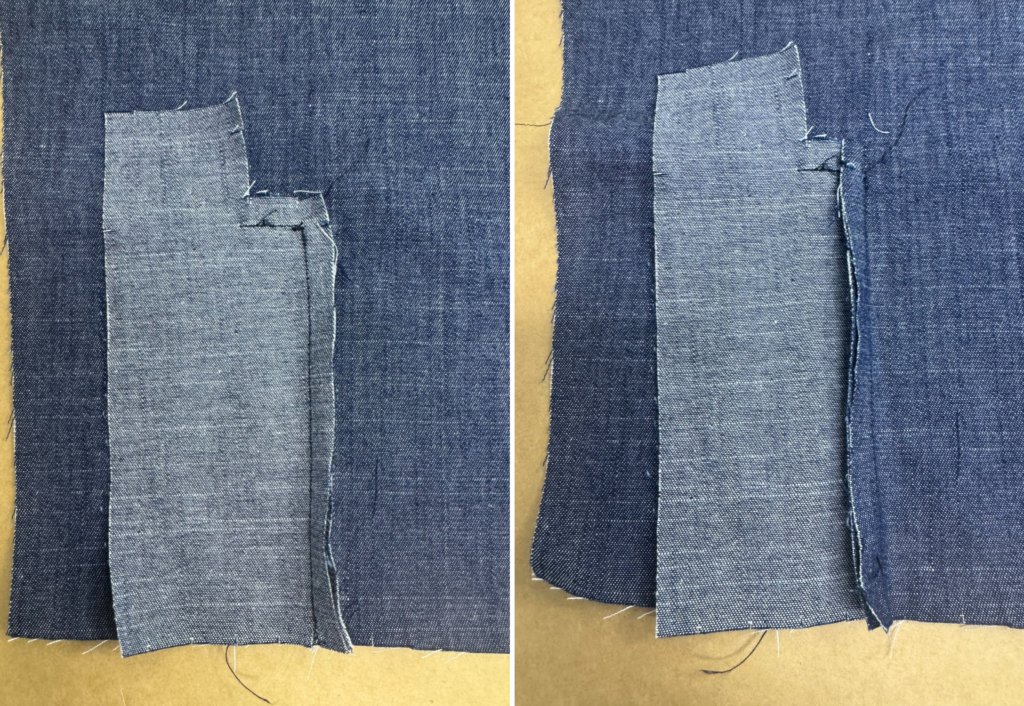
Push the placket/tab and bind to the right side and press.

Press the bind in half and press the seam allowance inwards, pin the folded bind to the sleeve and edge stitch along the outer edge.

Press and pin the placket/tab in half and the seam allowances inwards, once in place sew an edge stitch up the tab seam, across the top of the placket/tab and down the opposite side to create a square of topstitching. When arriving at the top of the under bind turn the corner and sew across the placket/tab. Make sure the “V” and top of the bind is covered by the placket/tab when stitched across the base.
With right sides facing sew the underarm seams of the sleeves together. Neaten the seam with an overlocker/serger, press towards the back and turn out to the right side.
SLEEVES 1 & 2 – Sleeve 1 (14) is suitable for the relaxed fit only and sleeve 2 (15) is suitable for the classic fit only
With right sides facing sew the sleeve seams together. Neaten with an overlocker/serger and press towards the back.
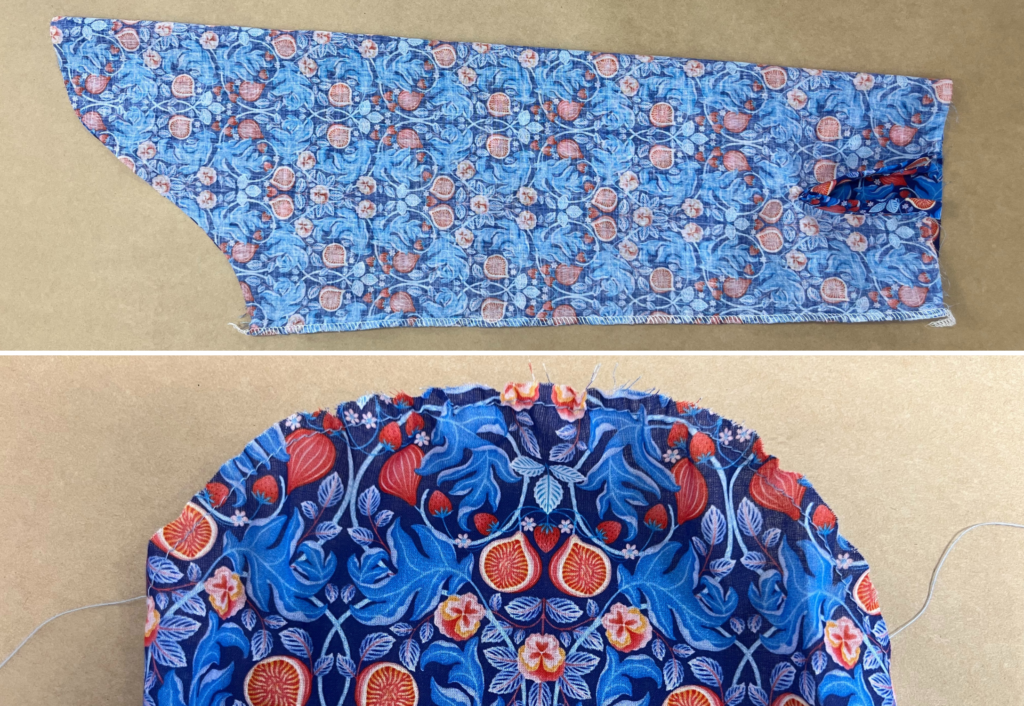
Sew a large stitch to the head of the sleeve and slightly draw in, this makes it easier when sewing the sleeve into the armhole.
Pin the tuck at the sleeve opening and stay stitch along the base to hold in place. Press towards the under sleeve seam.
CUFFS – For sleeves 1 & 2, the single cuff (19) or double cuff (20) can be used for this option
With right sides facing sew the two short ends of the cuffs together, turn to the right side and press in half lengthways.
Pin the raw edge of the inner cuff seam to the sleeve opening, once in place stitch together.
Press the seam allowance of the top cuff inward and pin to the sleeve seam, once in place stitch the cuff to the sleeve with an edge stitch on the side of the cuff.
SLEEVE 3 (16) and SLEEVE 3 CUFF (17) – Suitable for both relaxed and classic fit
Following the notches marked on the pattern pin the tucks in the direction marked. Once in place sew a basting stitch to hold the tucks in place and press towards the under-sleeve seam.
With right sides facing sew the sleeve seams together. Neaten with an overlocker/serger and press towards the back.
Sew a large stitch to the head of the sleeve and slightly draw in, this makes it easier when sewing the sleeve into the armhole.
With right sides facing sew the two short ends of the cuff together, press the seam open. Turn out to the right side and press in half lengthways.
With right sides facing sew the cuff to the sleeve opening. Neaten with an overlocker/serger and press the seam upwards.
SLEEVE 4 (18) – Suitable for both the relaxed and classic fit
With right sides facing sew the sleeve seams together. Neaten with an overlocker/serger and press towards the back.
Neaten the sleeve opening with an overlocker/serger.
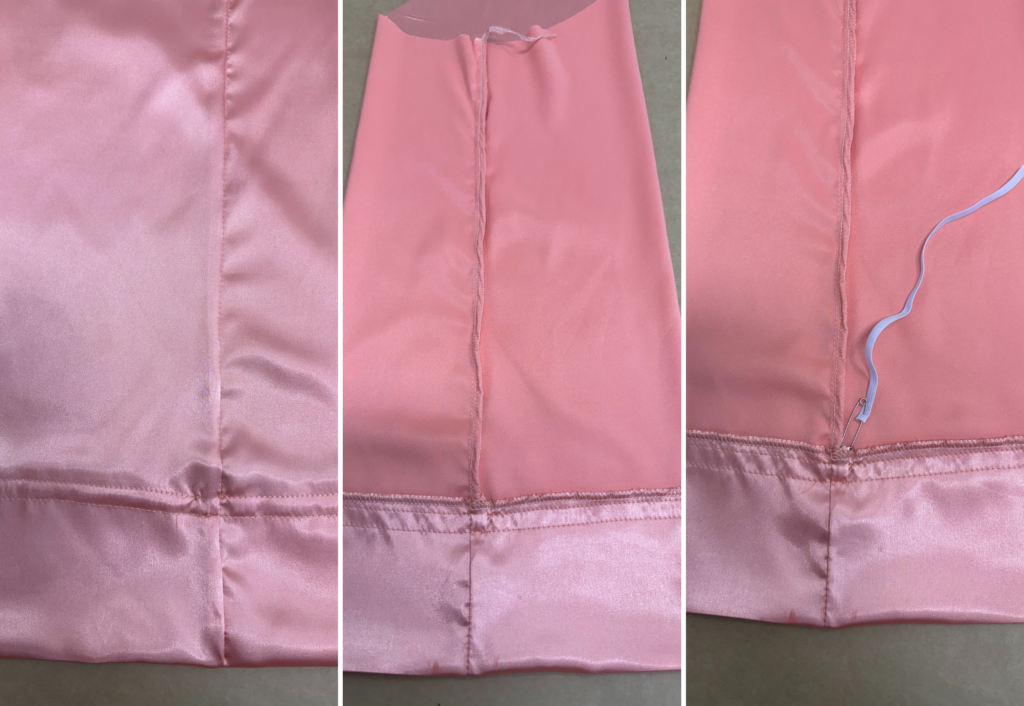
Fold the sleeve opening to the inside at the fold line marked on the pattern. Sew one row of topstitching close to the overlocked edge, then sew another row of topstitching 1cm (3/8”) below the first row, leaving a small opening to thread the elastic through.
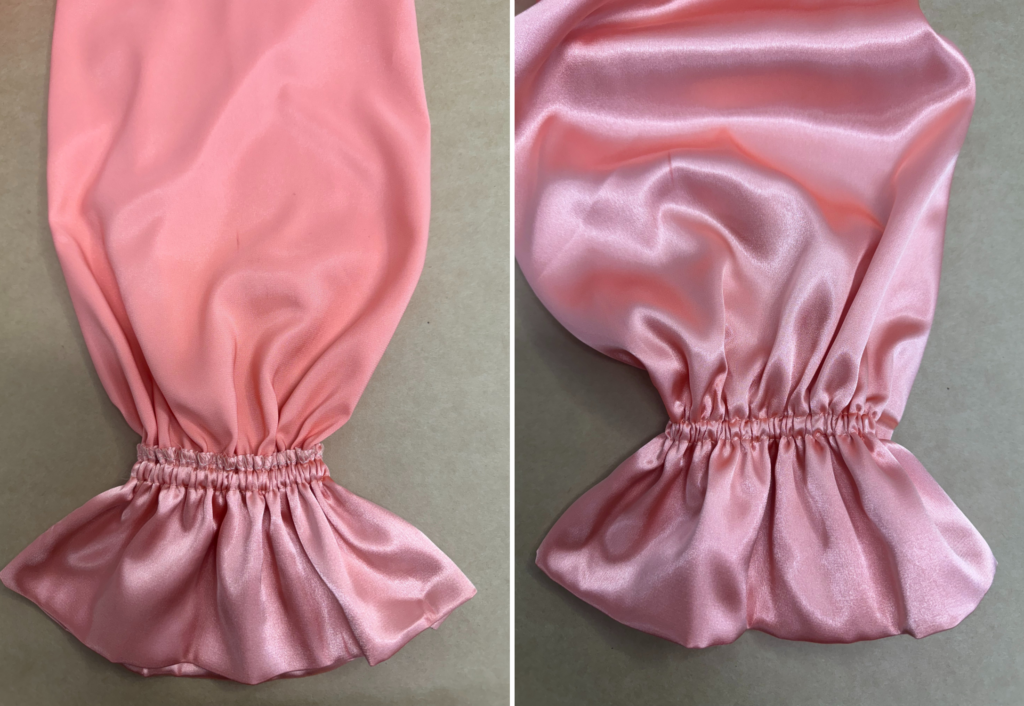
Cut the elastic to your personal length, thread the elastic through the casing and stitch the ends of the elastic together securely. Stitch up the opening in the casing. Stretch out the elastic to obtain an even spread.
Sew a large stitch to the head of the sleeve and slightly draw in, this makes it easier when sewing the sleeve into the armhole.
SLEEVE TAB FOR ROLL UP SLEEVE 1 (14) – Suitable for sleeve 1 for the relaxed fit only. Use the sleeve tab for rollup sleeve (24) for this option
With right sides facing fold the tab in half lengthways and sew across the short ends and down the side. Clip the corner and turn out to the right side. Neaten the cut top edge with an overlocker/serger and press. Pin the tab to the inside of the sleeve where marked on the pattern, once in place stitch to the sleeve with a cross shaped stitch.
SEWING THE SLEEVE OF YOUR CHOICE INTO THE ARMHOLE
With right sides facing sew the sleeve head into the armhole, matching the notches as you sew. Neaten the armhole with an overlocker/serger and press the seam towards the sleeve.
COMPLETION:
Sew the buttonholes to the right front as marked on the pattern, sew the buttons to the left front to correspond with the buttonholes.
Sew the buttonholes to the cuffs following the markings on the cuff patterns and buttons to the opposite side.
Sew a buttonhole to the end of the sleeve roll up tab and sew a button to the outside of the sleeve on top of the tab stitch line.
Lightly press your new shirt.