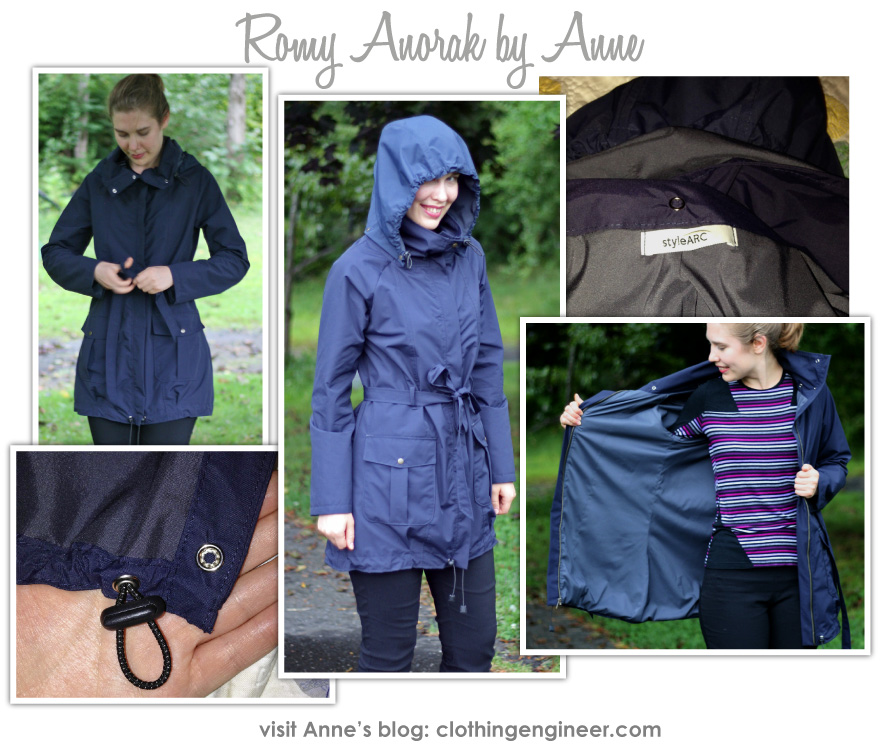
- Cut out the pattern, taking note of the grainlines, maximum stretch, and the notes written on the pattern pieces as this will assist you in the construction of the jacket.
- If your fabric is wide enough you may choose to have your centre back body on the fold. Just cut the centre back seam allowance off and write FOLD on the pattern piece at the centre back.
- Choose the weight of the open-ended zipper to suit the weight of your fabric. To help support the zipper you can apply 2cm wide strips of fuse to the wrong side of the centre front edges.
- This jacket can be made without a zipper if preferred. Just continue the buttons from the collar down the rest of front.
- Since the collar is a relaxed style we suggest a lightweight fuse.
- Seam allowances are 1cm or 3/8″. Seamlines are marked with a dashed line (—).
- French seams can be used to create a clean finish on the inside of the jacket. The seams can also be flat-felled or bound with bias tape.
- Topstitch seams with a twin needle or 6mm (1/4″) topstitch.
Construction:
- With the right sides together, sew the upper edge of the collar pieces together. Turn to the right side and press.
- Fold the pocket in half lengthwise, wrong sides together, and stitch the seam of the pocket box pleat as marked on the pattern.
- Open the pocket and fold the pleat in place. Press flat. Fold over the top and outer edges of the pocket and press.
- With right sides together, sew the outside edges of the pocket flaps together. Turn out to the right side and press. Edgestitch around the sides and lower (pointed) edge.
- Buttonhole the pocket flaps where indicated. Place pockets and pocket flaps aside.
- Sew the centre front to the side front. Topstitch this seam in place.
- Sew the pockets and pocket flaps to the front where marked on the pattern. Tip: to neatly finish the pocket flap, position the right side of the pocket front against the right side of the jacket body so the “point” faces upward and the raw edge is about 3mm (1/8″) below the flap placement line. Sew the pocket flap to the body using a 1/8″ seam allowance. Fold the pocket flap over the raw edge so the “point” faces downward. Topstitch about 6mm (1/4″) from the folded edge. The topstitching will now enclose the raw edge of the pocket flap.
- Sew the buttons to the pockets as marked on the pattern.
- Stitch the centre back pieces together. Sew the front and back side seams together. Press and topstitch both seams.
- Sew the shoulder dart on the raglan sleeve and press toward the back.
- Sew the sleeve seam.
- Set the sleeve into the armhole, following the notches.
- Stitch the outer collar neckline edge to the neckline, following the notches.
- Fold one of the fly guards in half lengthwise, right sides together. Stitch across the upper and lower edges. Turn the fly guard right side out, fold in half lengthwise, and press. Repeat for the other fly guard.
- Buttonhole the opening for the hem drawstring as marked on the pattern.
- Open the zipper. Take the left side of the zipper and place on top of the left body front between the notches. Place one of the fly guards on top. Make sure the raw of the fly guard is even with the raw edge of the centre front and baste in place.
- Take the other fly guard and place on the right front, making sure the fly guard raw edge is even with the the centre front raw edge. Place the zipper on top between the notches. Baste.
- Neaten the outer edge of the front facing.
- Sew the upper edge of the front facing to the inner collar edge.
- Sew the bottom of the facing to the front hem edge.
- Pin right facing to the right side of jacket, positioning it over the zipper tape. Once in place stitch from the hemline up to the top of the collar edge (see diagram).
- Place the left facing on top of the left fly guard. Stitch the centre front edge from the hemline to the top of the collar edge (see diagram).
- Press and fold the seam allowance of the inner collar to the inside. Stitch the inner edge of the collar to the neckline along the folded edge, matching at the notches to avoid any twisting.
- Sew and press the hemline tucks as marked on the pattern.
- Fold and press the bottom edge of the hem 1cm (3/8″) to the inside. Turn up the hem as marked on the pattern and topstitch in place along the upper folded edge.
- Thread the elastic through the buttonhole on one side of the hem and out through the opposite end. Attach toggles to the ends of the elastic.
- Make up and sew the belt loops to the body at the positions marked on the pattern.
- Buttonhole the collar as marked on the pattern. Zip up the jacket and mark the placement for the buttons on the collar. Sew the buttons to the collar.
- With right sides together, sew the belt pieces together at the centre back and press the seam open. Fold the belt in half lengthwise, right sides together, and sew the length of the belt, making sure to leave a small opening at the centre of the belt to for turning it out. Once the belt is turned out to the right side slipstitch the opening closed and press.
- Carefully press your new jacket.
